Welcome to our B.O.C. blog. Learn about the world of handcrafted ceramic beads, buttons, pendants & components.
Showing posts with label 1st Sunday. Show all posts

EVERYTHING'S COMING UP ROSES

Vintage Rose Brooch

Nothing says summer like roses, of course we are in mid winter here in Namibia, but our weather is mild and I still have a few roses blooming
My Rose Brooch is a little clunky, but I was afraid to make the petals too thin in earthenware clay.

Rose Pendants by Work Of Our Hands


Roses are not so hard to make, (here's a video) Wow is she ever fast though. 
Here is a video on painting roseshttp://www.youtube.com/watch?v=swHXycFjgkM  I could do with some soft music instead of toddler chatter, but the technique is great.


rose motif beads by Work Of Our Hands

Very very simple rose motif
The easiest of all is to paint a dot in underglaze, and then scratch a spiral so that the white clay shows.
Hope you enjoy working in your clay rose garden this summer !
Val in Namibia

IN AFRICA WE "MAKE A PLAN"

First some new pendants, and an update:

Here are the hollow P'clay beads from my last post. I used a bottle cap as size reference because I couldn't find a coin you might recognize. The large zebra bead only weighs 24 grams. If you missed the post see it here: http://www.blog.beadsofclay.org/2012/05/hollow-paper-clay-beads.html


Ok, so on to the subject of this post........ I was reading on the BOC face book page about all the different ways  bead artists fire their beads. Specifically, how they make the most of kiln space while still being sure no bead touches another while firing.  I thought maybe you would like to see how I do it here.

Our large kiln

In Africa we don't have all the clever tools and products available to us, but somehow necessity does become the mother of invention. African ingenuity  amazes me. Once someone fixed our leaking gas tank with sugar, water, and a bar of soap ! On our own, we would have been stuck 100 miles from home. Anyway, around here, when you don't have what you want, or think you need, you "make a plan" and get creative.

First of all I'll back up a bit and show you where the kiln is located.


Our town of Okahandja is known for it's woodcarvers market. Our kiln is located in our shipping container, converted to a shop, which is located at the very end of the market. We located it there, because the city won't let me have 60 amps in my home, only in a business !

Behind our container  there are about 8 guys that actually carve. They use power tools to rough in the design, then hand tools to finish. Most of the other vendors are actually just reselling work they bought from carvers in the north of the country, or from Zimbabwe.


You can see the container in the upper left of the photo. What's interesting, is that since installing electricity in the shipping container, We became the power company for the wood carvers. It cost about $500 to $600 US dollars to get the electricity lines run,  a prepaid meter, and everything hooked up, so the carvers can't afford to put in their own. ( Think 2 or 3 months wages). Of course this was all unknown to us as we were installing the electricity :) The carvers all run extension cords(LONG EXTENSION CORDS) from us to where they work under the trees. Luckily we have very little rain fall in Namibia, because when it does rain, you guessed it, lots of shorts in the wires ! 


Ok, last carving, but I couldn't resist, this guy is awesome !


I know I have been wandering, but background is good  right?


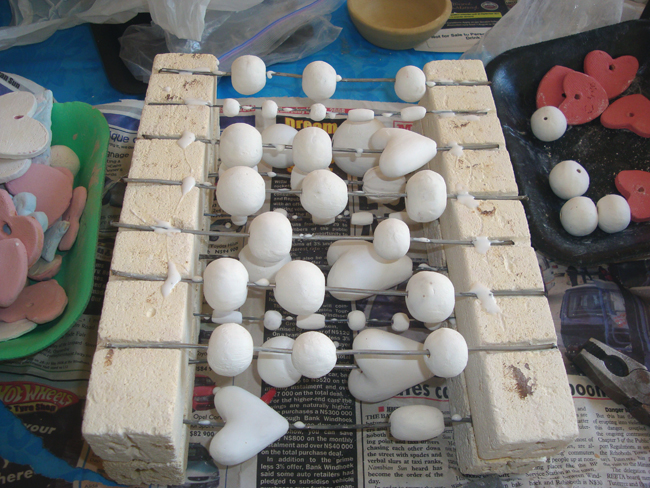
 So, after many many failures on placing our beads in the kin.( you know all melted together in a big ugly lump type failures) I hit on this: kiln bricks.

Each brick gets cut up into 6 pieces ( not fun).


Then we load the wires and beads, gluing the ends in place so they don't shift when moving them to the kiln. We stack 5 bricks high.
Here are 2 rows finished.


And here we go ready to fire. Notice even our stilts are round not square, like in the USA, or I would have used them instead of cutting up the bricks .

 Sometimes we fill the whole kiln with beads, but this time there were a lot of other things to fire as well. There is another shelf ( not shown) and when we load the kiln with almost all beads, we can fit about 1,000 beads of various sizes.

Until next month.... Val


Hollow Paper Clay Beads

molds, and hollow beads

I sell most of my beads as finished jewelry. I have been hearing  from some customers, that our necklaces are too heavy for them.  Using paper clay is one answer, but I was thinking.... if I used paper clay and made the beads hollow they would really be light weight. With that in mind I went really wild and made a super big bead, as well as my usual largest bead.

Last year I  made hollow P' Clay ball ornaments, but I started with crumpled newspaper in a ball and covered that. With the newspaper method however, it's hard to get the sizes consistent.


The nice thing about paper clay, besides being lighter in weight, is that it joins together really well. (You can even add new clay to clay that is bone dry. For more on paper clay and making your own, see my post here)
My mold making is really quick and dirty. I just press a bisque fired shape into fresh clay, then bisque fire the mold. If the shape is the same on both sides, you only have to make a one sided mold and use it for both sides of the hollow bead. However if needed, you can make a rough 2 sided mold by letting the first side harden up a bit, then place some paper strips on the first molds edges, and press on more fresh
clay.

To make the beads I roll out a small slab and press it into the bisque mold and scrape away the excess clay. Then I make the second side and use P' clay slip to join the 2 sides. ( no need to score with P'clay) Next I make the holes and walla, a hollow bead.

Next month some pictures of the finished necklaces.
www.workofourhands.blogspot.com

ENDLESS EXPERIMENTS

Pendants from carved stamps.

If you remember my sketches from a couple of months back,  well, I finally have a few pendants finished.
I sponged underglaze on the stamp, and then added details freehand. In the first two I also used some dimensional black underglaze. With the Protea, I pressed harder while the clay was soft and got some nice texture. 

 (See original post If you missed it @ http://www.blog.beadsofclay.org/2012/02/inspiration-africa.html )

Sometimes I feel like I am forever experimenting, yet never making progress. I am so hard to please; never entirely satisfied with my results. In this case, I also worked some of the designs into Ba relief mini tiles. Which I will reduce in size further for pendants.

Even though I cut them out using a template, I had trouble keeping them squared up and all the same size. 
These are also painted with underglaze.

Which technique do you think is most effective? I'm open to suggestions.


INSPIRATION AFRICA


Did you ever hear something you knew you needed to hear, yet hated to hear it? I am so busy while in Africa, with training and teaching, plus trying to overcome and keep technical problems at bay, that I didn't want to hear that our beads were not unique enough.  But,...... I knew it was true, and that I had to find time for design, not just production.

While in the USA this visit I've tried to emerse myself in African design via the internet, and think about where I want to go with some special focal pendant beads. Here are some of my favorite African design finds. I just love the fabrics in Africa, but can't decide how to uniquely interpret them into clay. 


Wax prints are a big part of African design


These prints are stamped from carved potatoes


Telephone wire baskets

Of course color can't be overlooked when thinking African design. Either earth tone pallets or wild primary color pallets.

Ndebele house detail

Christie Brown fashion design

 I love proteas. They are so sculptural.

Here are some of my idea sketches . I am not great at drawing.
and now, how to translate ideas to clay?

I would love some stamps made from here http://www.4clay.com/ But we could only afford maybe 1 stamp, and I am too nervous about my drawing ability to actually commit the big bucks. Plus how to chose which one.


So, to postpone any decision on ordering a stamp, I decided to carve a few.

Here's how they look stamped with ink.
I have had some luck in the past with using a small foam roller and stamping with underglaze.
Unfortunately I don't have a clay studio here in the USA, so I can't go on to the next step of this experiment until my return in a few weeks.
I'll report in next month hopefully with some results of this on going experiment.

http://www.workofourhands.blogspot.com/

MOLDS: " QUICK AND DIRTY"

Hello again, It's spring time in Africa. I'm enjoying strawberries from my garden, and lots of flowers. It seems just last week I was reading about Spring time in the Northern hemisphere, and now it's here in the Southern.

As promised, here are pictures of the finished ornaments from last month's post on making your own stamps. (They are still warm from the kiln, finished just in the nick of time. ) Here's a link if you missed it. http://beads-of-clay.blogspot.com/search/label/with%20Val


PLASTER MOLDS
Plaster molds are not my favorite. You can see one reason in the photo, they break easy. Especially if many people are using them. They do have their place however, so I'll tell you how I do it. For this mold, I started with a styrofoam type  meat or produce tray, and lined it with smooth, flat, and  damp clay. Then I placed my originals ( check for undercuts first. and if you have them, fill the undercuts with wet clay or plastiline) face up on the clay and pressed them down just a bit so no plaster would leak underneath. (coat your originals with Vaseline first.)
Mix your plaster and pour slowly into the tray covering the originals with a minimum 1/2 inch of plaster.( more is better) Shake it a bit before it sets to get the bubbles to rise, let it cure, and you are finished.  When you pull the clay out and take out the originals, hopefully there were no under cuts in the originals. If there were, the original is permanently in the plaster. (Another thing I don't like about plaster !)

BISQUE MOLDS

OK,  here's the "quick and dirty" way, Bisque molds. Perhaps you will not get quite as much fine detail as with plaster, but the advantages outweigh that for me . This method works best if your original is also bisque, Although you can do it with glazed items( corn starch to release), or even sometimes with bone dry items as long as they are very flat and not too delicate.

Place your original on a  flat board or bisqued tile,  wedge a ball of clay the appropriate size,  push the wet clay down over the original. In a minute or so you can pull it off.  If it didn't work try again, no loss. Plus, if there was a slight undercut, making removal hard, you can still work on your original to correct the problem. When planning your original remember to consider shrinkage, since your original will shrink,  your mold will shrink, and the new piece you pull will shrink.

Some originals are too complex for a one piece mold, but you can always mold parts and put them together. Here I made separate molds for the dress and wings, and I sculpt the face new each time. This also helps to make each piece a little different.

MORE MOLDS
 In the photo above the daisy was from a mold and I attached it to a piece of clay  I cut from a template. When you attach clay from a mold to something else I think it's called a sprig. I have attached these sprigs to  mugs, planters, and all sorts of things. They are very handy to have around. The only problem is finding the one you are currently looking for :)

I suppose it goes without saying how one would use the molds, but just in case there is a real newbie out there,  You should have a piece of wet, wedged clay and just firmly press it into the mold. Scrape away the excess clay with any flat tool, scraping from the center outward.   When it's ready to come out of the mold, you will see the edges start to pull away from the mold. Turn it over and tap it lightly on the table and WALA !

Happy mold making folks, and I'll see you next month. I am going to experiment with fired paper clay, so hopefully I will have some advice on it by next blog. Enjoy your autumn.
Val in Namibia
www.workofourhands.blogspot.com

SAVING A LITTLE TIME Part 1

In this series I will talk about making multiples of your creative efforts, thus saving time.                Today I will show how I make texture stamps, and next month, I will show bisque mold making.
TEXTURE STAMPS


Whether you create  a stamp or a whole texture plate, the process is the same. First draw your design, keeping in mind the shrinkage of your clay. Roll out your clay at least 1/2 to 3/4  inch thick, and lay the pattern on the clay. It will stick nicely because the clay is wet. I use my needle tool to transfer the pattern by poking holes thru the pattern and onto the clay. I also cut out the shape with my needle tool


Let your clay harden up a bit to leather hard.  I usually let it dry under 2 bisque d tiles and some weight, so it doesn't warp.  Then I do most of the carving with my small loop tool.  First I just carve some basic straight lines, then I let it harden some more and use the loop tool again to bevel the lines. Have a soft tooth brush near by to remove the crumbs of clay. I'm sure your husband won't mind you using his :). Anyway he won't know will he ??

 FINISHED STAMPS  I want to make Christmas ornaments with these.

I continue to dry the stamps under weights. Some people put handles on the back, which is nice, but then you can't dry them under weights very well.


Here is a hanging planter ( in progress and upside down) where I used the heart stamp to make a sprig.


SOME OTHER TEXTURE OPTIONS:

 Here is a texture roller.
 I made a clay tube, then while leather hard I applied slip to the roller
You can do the same thing with hot glue and an old wooden rolling pin. I haven't actually tried it, but "they" say it works :).

One last photo, just to remind you that you can also carve stamps in those nice eraser type carving blocks, or even wood ( Oh but I was trying to save you time wasn't I). I am actually thinking of getting one of the African wood carvers here to carve a block for me.

The stamp on the right was carved on a Stadler carving block. They are somewhat fragile , but then I didn't take time to mount it either. Hum, sometimes time saved is time lost.
Happy carving. 
Next month I hope to have some finished products to show.
Enhanced by Zemanta