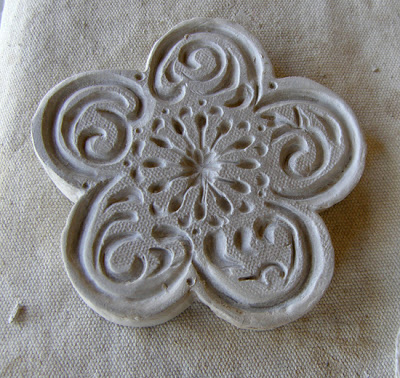
In this series I will talk about making multiples of your creative efforts, thus saving time. Today I will show how I make texture stamps, and next month, I will show bisque mold making.

TEXTURE STAMPS
Whether you create a stamp or a whole texture plate, the process is the same. First draw your design, keeping in mind the shrinkage of your clay. Roll out your clay at least 1/2 to 3/4 inch thick, and lay the pattern on the clay. It will stick nicely because the clay is wet. I use my needle tool to transfer the pattern by poking holes thru the pattern and onto the clay. I also cut out the shape with my needle tool
Let your clay harden up a bit to leather hard. I usually let it dry under 2 bisque d tiles and some weight, so it doesn't warp. Then I do most of the carving with my small loop tool. First I just carve some basic straight lines, then I let it harden some more and use the loop tool again to bevel the lines. Have a soft tooth brush near by to remove the crumbs of clay. I'm sure your husband won't mind you using his :). Anyway he won't know will he ??
I continue to dry the stamps under weights. Some people put handles on the back, which is nice, but then you can't dry them under weights very well.
Here is a hanging planter ( in progress and upside down) where I used the heart stamp to make a sprig.
SOME OTHER TEXTURE OPTIONS:
I made a clay tube, then while leather hard I applied slip to the roller
You can do the same thing with hot glue and an old wooden rolling pin. I haven't actually tried it, but "they" say it works :).
One last photo, just to remind you that you can also carve stamps in those nice eraser type carving blocks, or even wood ( Oh but I was trying to save you time wasn't I). I am actually thinking of getting one of the African wood carvers here to carve a block for me.
The stamp on the right was carved on a Stadler carving block. They are somewhat fragile , but then I didn't take time to mount it either. Hum, sometimes time saved is time lost.
Happy carving.
Next month I hope to have some finished products to show.


Val! Fabulous post! It is great to see how each of us create our designs in clay. Thanks for sharing with us.
ReplyDeleteI look forward to your next post.
Great detailed tutorial, thanks! Love the bird and heart!
ReplyDeleteGreat post!! It gave me some wonderful ideas!! Thanks a lot!!
ReplyDeleteExcellent Tutorial - love it
ReplyDeleteIts always great to see people share their knowledge
Thanks, as always you guys are a great audience :)
ReplyDeleteGreat post Val. Love the photos with such clear detail. Wonderful ideas. Thanks so much.
ReplyDeleteThank you! Wonderful article!
ReplyDelete