

Today's Tool Talk Thursday post is about tools for firing beads and pendants in the raku method. There is always and especially recently a lot of interest about raku ceramic beads. I am focusing today on the ways several artists fire their pendants and beads so that they survive the firing without sticking together. I will start with a metal rack that I have constructed. I was inspired by an article by Sue Ki Wilson
in Lapidary Journal a number of years ago. You can purchase that article here . I have since modified her design to fit my small kiln. I have also added a kind of handle to make picking up the rack easier.

Picture of my Paragon Kiln with constructed bead rack ready to be removed. Notice the rack is dark red it is so hot. About 1750 degrees. All those white pieces are unglazed and will turn black in the reduction pot.

leaves after being in the reduction pot--nice and black

Here is a close up photo of the bead rack before it is loaded. I am cleaning off the bits of loose carbon since they could end up on a bead during the firing. I use 19 gauge steel wire to string the beads.

Here is Natalie Pappas' design for firing beads. She made and fired this chamber from a high fire clay to make sure it can withstand the raku firing and reduction. She has made sure none of the beads touch each other so they won't stick together. Her device also insures that they don't slip together while they are being transported to the ash can for the reduction part of the firing.

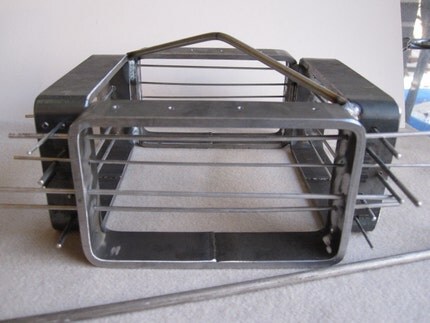
Here is a device for sale on the UpcycledArt Shop on Etsy. It is especially made for firing raku beads. It is small enough for a test kiln. It looks sturdy and easy to move from your kiln to the reduction pot. The handle on the top makes it very easy to remove from a top loading kiln. You can view a video of this rack in action here

Maku Studio, Marianne "MAK" Kasparian, sent me this photo of how she fires her raku beads and pendants. She puts the pendants right on the kiln shelf. Her beads she strings from wires and makes sure she leaves a little space on top and bottom of her beads unglazed so they don't stick together. She carries each tray and rod to the reduction can with tongs.

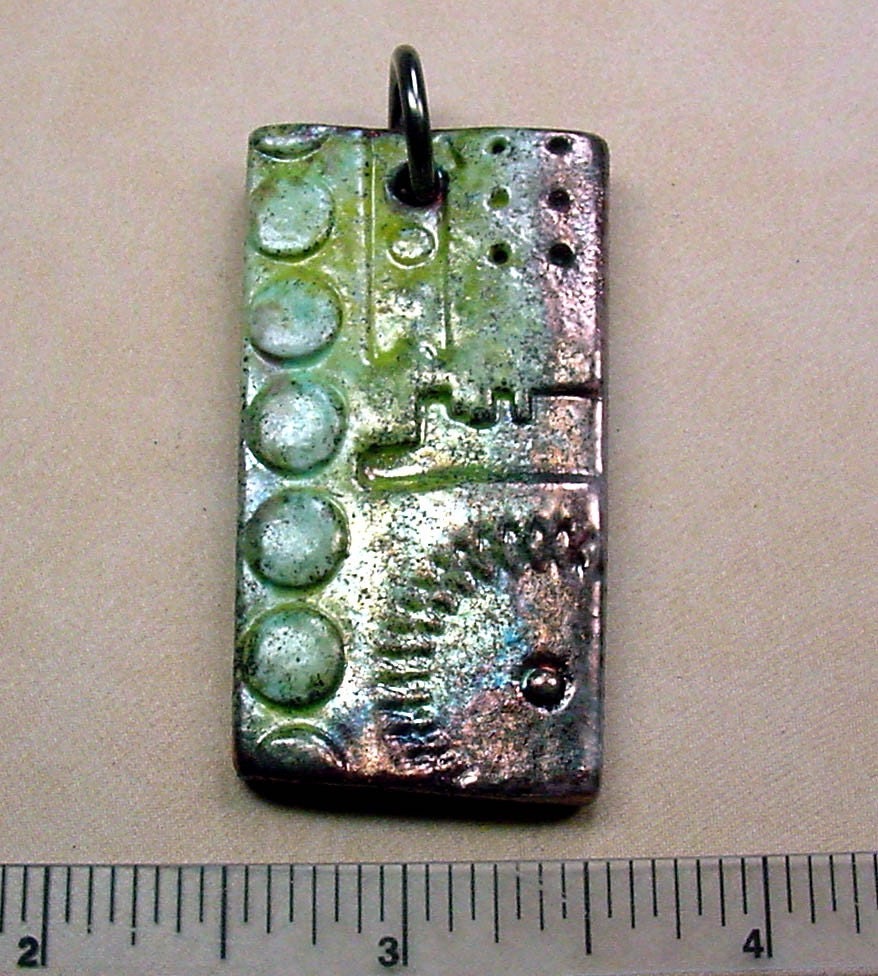
One of MakuStudio's fabulous raku pendants.
You can see more of her work on her Etsy Shop. or find her at the Bead and Button Show, booth 142.

Melanie of Earthenwood Studio has been doing some raku firing lately. She tells me she puts her pendant directly on the kiln post since they are not glazed on the back they won't stick. She transports the post directly to the reduction can. You can see that she is using her AIM 88 kiln in this photo and is about to pick up the post with the raku tongs in this photo. Below are some pics of her wonderful raku fired hearts and ToolBox pendants that are available on her Etsy Store.

LisaPetersArt has shared some wonderful photos of her raku work and insight into her process. She will be at the Bead and Button Show. Booth 1213. Please check out her work there. And on her Etsy Shop.


Here are LisaPetersArt insight into Raku firing beads and pendants:
Each Flat piece should be removed from the kiln one by one, when glazes begin to cool a bit, then they can be removed 3 and 4 at a time using a spatula.
pieces that are placed on a rod, such as beads w/holes, a few seconds should be taken so the pieces "rest" and glazes that have a high frit content can set up a bit. Then each rod is removed from the bead tree, or the kiln furniture that has been prepared to act as a bead tree (using a gloved hand, a tong or whatever tool works best for the individual) and placed in the combustible matter, carefully. I do not support the idea of placing a rack filled with many beads into reduction material because there is no control. I like to address each item individually and decide "sawdust side up or down" and work in layers so that every piece has a chance to reduce properly. If the individual chooses to use a bead rack that cannot be disassembled for the reduction process, then the individual should wait a few moments until their "glassy" glazes have set up so that if they slide next to each other in reduction they will not stick.
Raku is usually seen as a manic, high energy rush to get pots and wares into reduction.. when working with beads and pendants this is really not necessary. Take your time and be careful because straw marks on pendants are not interesting and curious like straw marks on a giant vase. Be precise and treat the pieces delicately, if you do then you will probably not have a problem with sticky glazes.
As always this is a creative process that is entirely up the the individual. My way of firing suits me but there are many ways to do this. It should all be artist-specific and the person doing the firing should decide what is best for their style of work., some people adore marks on their pieces and if this is the case then don't wait as long to have the frit filled glazes set up, throw them in while they are still "tacky" so that you get the result you are looking for.
Copper Matt Glazes and glazes like that don't really need any time to set up, chances are by the time you remove the lid, shut off the burner and prepare yourself to remove the ware they have set up all ready and will not stick together.. so if you are firing 2 different types of glazes only I would suggest you split your loads accordingly.
If you have ways of firing your raku beads and pendants I would love it if you would share them with us in the comment section. Thanks so much. And if you haven't tried this yet, I hope you will. You can see my raku bead firing video from a few years back on UTube if you want more details on how this works. Here is the link
Posted by Mary Harding www.maryhardingjewelry.com
Fabulous post! drooling over everybody's raku!
ReplyDeleteThank you Mary.
thank you for such detailed and great information- makes me want to try the process but so far my husband won't let me play with fire!LOL
ReplyDeleteSomeday! (Sighing heavily)
ReplyDeleteWow!! That is an awesome....informative post! I just may want to try that someday :O)
ReplyDeleteThis was truly valuable insight!! I use other setups, and actually posted that recently in my blog, which is in Italian though. The post was about Egyptian paste beads but the racks were devised to be used for raku firing too. Thank you!!!!!
ReplyDeletesilviapotter
I love seeing how everyone is raku firing beads! I made some smaller canisters so they would fit in my smaller kiln. I'm waiting for them to dry so I can bisque fire them and raku more beads. I think I am addicted.
ReplyDeleteGreat topic and thanks for featuring my raku set up!
ReplyDeleteDoesn't the Aim 88 have exposed elements? I thought it was bad for the elements to do raku and that a kiln with enclosed elements was best.
ReplyDeleteI have been using the same tiny aim kiln for awhile doing raku. I put a cone 6 cone in the sitter so I don't have to worry about the cone bending and dropping. I was starting kiln on 2 then turning up every 2o minutes until orange hot and glassy looking. Then would pull it out. Has anyone got different results from using colored newsprint versus black and white? I am interested in a different bead rack though would like to build a steel one. Glad to see everyone having fun :)
ReplyDelete